Getting started with Java Threads – Part 1

I am learning for the Java OCP 7 and summarizing some relevant infos about Multithreading.
For now I am referring to chapter 13 in the book by G.Ganesh.

You can create threads in 2 ways: extending the Thread class or implementing the Runnable interface
Extending the Thread class is more convenient if you don´t need to extend another class that is not “Thread” (since in java you can only extend one class), because you can use the class methods directly (like “getName()“).
If you implement the Runnable interface (preferred way because of inheritance) you will have to use the static method “currentThread()” of the Thread class to do your operations on the thread (like setting or getting the name).

The two fundamental methods to know are:
run(): like a main method, necessary to enable the execution of a thread.
start(): that creates the thread.

The thread will be terminated when the run method execution is complete. It´s invoked implicitly by the JVM (DON´T invoke it explicitly!).
The main method starts a Thread called “main“. If you create and start your own thread it will have default names like “Thread-0“, “Thread-1“.

If you extend the thread class you need to override the run() method (otherwise it does nothing). If you implement the Runnable interface you will have to implement the run() method (mandatory)

The following code will help you to understand more about these first concepts.

public class MyThread1 extends Thread {

	public void run() {
		System.out.println("Extending the Thread class - Thread name: "
				+ getName() + " - priority: " + getPriority() + " - group: "
				+ getThreadGroup().getName());

	}

}
public class MyThread2 implements Runnable {

	public void run() {
		Thread thread= Thread.currentThread();
		System.out.println("Implementing the runnable interface"
				+ " - Thread name: " + thread.getName()
				+ " - priority: " + thread.getPriority()
				+ " - group: " + thread.getThreadGroup().getName());

	}

}
public class ThreadsDemo {

	public static void main(String[] args) {

		// extending Thread
		Thread myThread1 = new MyThread1();
		// implementing Runnable
		Thread myThread2 = new Thread(new MyThread2());

		System.out.println("Threads defined. Default properties: ");
		//name, priority, group returned by the toString method 
		System.out.println(myThread1);
		System.out.println(myThread2);
		System.out.println("Changing default names...");
		myThread1.setName("Thread_1");
		myThread2.setName("Thread_2");
		System.out.println("Threads will be started...");
		myThread1.start();
		myThread2.start();

	}

}

The output of the main method should be something like:

Threads defined. Default properties:
Thread[Thread-0,5,main]
Thread[Thread-1,5,main]
Threads will be started...
Extending the Thread class - Thread name: Thread-0 - priority: 5 - group: main
Implementing the runnable interface - Thread name: Thread-1 - priority: 5 - group: main

Launching the main program you see that the threads are started asynchronously. Sometimes you see:
Implementing the runnable interface - Thread name: Thread-1
Extending the Thread class - Thread name: Thread-0

Sometimes it´s:
Extending the Thread class - Thread name: Thread-0
Implementing the runnable interface - Thread name: Thread-1

You can quickly proof it in Eclipse launching the program with the shortcut Ctlr+11.

To change this “random” behaviour you can set the priority with the setPriority() method, from 1, the lowest, to 10, the highest. The default is 5. They can be all retrieved by the static members:
– Thread.NORM_PRIORITY ;
– Thread.MAX_PRIORITY ;
– Thread.MIN_PRIORITY .

Threads can be in one of the following states:
– NEW (created)
– RUNNABLE (started)
– TERMINATED
– BLOCKED (waiting to acquire the lock)
– WAITING (waiting for notifications)
– TIMED_WAITING (sleep() invoked and the thread is sleeping or if wait() with timeout)

States are defined with the Thread.State enumeration.
You can get the state with the getState() method.

Install Apache web server on Windows

To install apache on Windows, you can download the binary from:
http://www.apachehaus.com/cgi-bin/download.plx?dli=gUEJEMjNVWx4EVV9yUsZVTJVlUGRVYSFlUuB3T

Then you need to edit the httpd.conf file to change the path to the server root (SRVROOT). It should be something like:
Define SRVROOT “C:\Users\laura\httpd-2.4.12-x86-r2\Apache24”

If you are running Skype (that listens on the port 80), there will be a conflict In this case you need either to kill Skype or change the default Apache listening port in the httpd.conf

If you need to enable apache modules (if no yet enabled) that you might need for your activities you need the “a2enmod” command.

There are several solutions that you can fidn by googling, like:
http://aninternetpresence.net/program/
https://github.com/enderandpeter/win-a2enmod

Wildfly Standalone clustering

To set up a cluster of standalone servers you have two possibilites: nodes running on different machine (horizontal scaling) or running on the same machine (vertical scaling).

To make a wildfly standalone cluster with 2 nodes on the same machine you can follow the steps below:

1) copy the standalone folder and rename it to „standalone1“, „standalone2

2) create 2 scripts in the /bin folder, to avoid typing all the parameter in the command line each time.

script1.sh

#!/bin/sh
./standalone.sh -Djboss.server.base.dir=$JBOSS_HOME/standalone1 -Djboss.node.name=server1 -c standalone-full-ha.xml

script2.sh

#!/bin/sh
./standalone.sh -Djboss.server.base.dir=$JBOSS_HOME/standalone2 -Djboss.node.name=server2 -c standalone-full-ha.xml -Djboss.socket.binding.port-offset=100

To bind the public interface to a specific address add the IP as parameter like the following :
-b 192.168.1.1
For the management console it´s something like:
-bmanagement=192.168.1.1

To bind to all available IPs set them to „0.0.0.0“ like:
-b 0.0.0.0 -bmanagement=192.168.1.1

The high availability configuration has default multicast addresses set to 230.0.0.4.

They can also be changed in the socket-binding section in the standalone xml file.

Alternatively you can add it as parameter like : -u=230.0.1.2

The port offset must be considered, if you need to run the cli for the second instance specify the port:
./jboss-cli.sh --controller=localhost:10090 --connect

3) Set the hornetQ clustering username and password.

The cluster nodes must have the same user und password otherwise you will get:

ERROR [org.hornetq.core.server] (default I/O-1) HQ224018: Failed to create session:
HornetQClusterSecurityException[errorType=CLUSTER_SECURITY_EXCE
PTION message=HQ119099: Unable to authenticate cluster user: HORNETQ.CLUSTER.ADMIN.USER]

To fix this add the cluster username and password in the subsystem messaging:2.0 for any standalone xml configuration file under the tag hornet1-server :

 <clustered>true</clustered>
<cluster-user>clusteruser</cluster-user>
<cluster-password>cluster-secret</cluster-password>

Otherwise you can set to false if you don ́t need to cluster the messaging.

4) run the scripts in two different terminals (start with server 1).

5) deploy the app.
The clustering service will be initiated only if a cluster-enabled application is deployed.
In the web.xml of the application you need to add the distributable tag:

<distributable/>

You need to deploy the app in every server instance

You can try it with the app by Arun Gupta called „clustering“, that you can find at https://github.com/arun-gupta/wildfly-samples.
To make it a little simpler you can create a maven simple project and copy the content in the webapp folder (https://github.com/arun-gupta/wildfly-samples/tree/master/clustering/http/src/main/webapp).
Then you can edit the pom.xml like the following:

<project xmlns="http://maven.apache.org/POM/4.0.0" xmlns:xsi="http://www.w3.org/2001/XMLSchema-instance" xsi:schemaLocation="http://maven.apache.org/POM/4.0.0 http://maven.apache.org/xsd/maven-4.0.0.xsd">
  <modelVersion>4.0.0</modelVersion>
  <groupId>de.demo</groupId>
  <artifactId>demo-clustered-app</artifactId>
  <version>0.0.1-SNAPSHOT</version>
  <packaging>war</packaging>
  <name>Demo_Clustered_App</name>

  <properties>
        <project.build.sourceEncoding>UTF-8</project.build.sourceEncoding>
        <project.reporting.outputEncoding>UTF-8</project.reporting.outputEncoding>
    </properties>

    <dependencies>
        <dependency>
            <groupId>javax</groupId>
            <artifactId>javaee-api</artifactId>
            <version>7.0</version>
            <scope>provided</scope>
        </dependency>
    </dependencies>

    <build>
        <plugins>
            <plugin>
                <groupId>org.apache.maven.plugins</groupId>
                <artifactId>maven-compiler-plugin</artifactId>
                <version>3.1</version>
                <configuration>
                    <source>1.8</source>
                    <target>1.8</target>
                </configuration>
            </plugin>
            <plugin>
                <groupId>org.apache.maven.plugins</groupId>
                <artifactId>maven-war-plugin</artifactId>
                <version>2.4</version>
                <configuration>
                    <failOnMissingWebXml>false</failOnMissingWebXml>
                </configuration>
            </plugin>
        </plugins>
    </build>
</project>

Run mvn package. In the target folder you will find the .war file, that you can manually deploy in each management console.
At the following urls you will see that the node server names are different for the two urls but the session data is shared:
http://localhost:8080/demo-clustered-app-0.0.1-SNAPSHOT/index.jsp
http://localhost:8180/demo-clustered-app-0.0.1-SNAPSHOT/index.jsp

Once you get your app deployed on both instances in the logging of the server one you will see something like:

INFO [org.infinispan.remoting.transport.jgroups.JGroupsTransport] (Incoming-1,shared=udp) ISPN000094: Received new cluster view: [server1/web|1] (2) [server1/web, server2/web]

Defining a port offset is not the only way to set up a cluster on the same machine.
You can also define multiple IP addresses on the same machine (multihoming).

MySQL CHECK constraint alternative: triggers!

Yesterday I discovered the powerful hibernate check constraint (@org.hibernate.annotations.Check) , which can be directly added in your entity class like this:

@Entity
@XmlRootElement
@Check(constraints = "age IS NOT NULL")
public class Person{

String firstname;
String lastName;
Integer age;

// valid code
}

Unfortunately, as you can read in the official MySQL docs, “the CHECK clause is parsed but ignored by all storage engines”.
Yesterday I found out that MySql 5.X doesn´t support the SQL CHECK constraint.
It means that if you are using JPA und HIBERNATE you can´t take advantage of the Check annotation!

In the project I am working on we could successfully export the schema with the maven command “hibernate4:export”. The check constraint was added in the create table statement. So if your DBMS supports it you get the job done in a very elegant way.

The way out I could find by googling a bit is not so elegant, but it allowed me to achieve the same result. I have just written a trigger, like the (simple) following:

CREATE TRIGGER check_age
BEFORE INSERT ON person
FOR EACH ROW
BEGIN
IF age is NULL
THEN
SIGNAL SQLSTATE '45000'
SET MESSAGE_TEXT = 'Age cannot be null';
END IF;
END;

MySQL has been bought by Oracle. Is this silent ignoring is a strategy to make people migrate to Oracle DBMS? I am afraid it´s so. Corporation games, my friends!

Selenium Web driver tests fail if run all together

If you write unit tests that must be run like if you had to open/refresh a new browser session each time, you can use a method with before annotations:

@Before
public void refreshPage() {
    driver.navigate().refresh();
}

If all tests are individually successful (green) but fail all together, the reason might also been that you need to wait for some resources to be available on the page, so you also need to handle it, setting the timeout like this:

 public WebElement getSaveButton() {
     return findDynamicElementByXPath(By.xpath("//*[@id=\"form:btnSave\"]"), 320);
 }

320 is a long time, but you must make sure that you give enough time to get all that it takes to test.


Primefaces dialog framework: how to make it work

If you have tried some primefaces features, you have probably noticed than some of those pretty things in the official showcase don´t work straight and easy in the application you´re developing. The problem is that even the latest 4.0 version is bugged.

I have been trying to use a Dialog Framework, but there´s something missing from the JqueryUI library and I have found out that the only way to make it work was including an external one, like:

There´s something missing from the JqueryUI library and I have found out that the only way to make it work was including the jqueryUI library (with the h:outputScript component).

<!DOCTYPE composition PUBLIC "-//W3C//DTD XHTML 1.0 Transitional//EN"
"http://www.w3.org/TR/xhtml1/DTD/xhtml1-transitional.dtd">

<html xmlns="http://www.w3.org/1999/xhtml"
xmlns:h="http://java.sun.com/jsf/html"
xmlns:f="http://java.sun.com/jsf/core"
xmlns:ui="http://java.sun.com/jsf/facelets"
xmlns:p="http://primefaces.org/ui">

<h:head>
<title>Enter Product Mapping</title>
</h:head>

<h:outputScript name="js/jquery-ui-1.10.4.custom.min.js"/>

<p:commandButton value="Map"
actionListener="#{managedBean.showDialog}" />
</h:form>

</h:body>
</html>

Importing the jqueryui library is the only way to let the browser find the dialog properties (like “draggable”, “resizable”, “width”…). So I could make the following method work:

public void showDialog(){

Map<String,Object> options = new HashMap<String, Object>();
options.put("contentHeight", 340);
options.put("height", 400);
options.put("width",700);

RequestContext.getCurrentInstance().openDialog("dialog",options,null);

}

It will open the dialog that you need to put in another page (in this case the dialog.xhtml file):

<!DOCTYPE composition PUBLIC "-//W3C//DTD XHTML 1.0 Transitional//EN"
"http://www.w3.org/TR/xhtml1/DTD/xhtml1-transitional.dtd">
<ui:composition xmlns="http://www.w3.org/1999/xhtml"
xmlns:ui="http://java.sun.com/jsf/facelets"
xmlns:h="http://java.sun.com/jsf/html"
xmlns:f="http://java.sun.com/jsf/core"
xmlns:p="http://primefaces.org/ui">
<h:head>
<title>Enter Product mapping</title>
</h:head>
<h:body>
<h:form id="form">

<h:panelGrid id="grid" columns="3">

<f:facet name="header">
<p:messages for="query" />
</f:facet>

<h:outputLabel value="Username" />
<p:inputText id="username" value="#{managedBean.userName}" />
<p:message for="username" />

<h:commandButton value="Save" id="btn" process="@form" actionListener="#{managedBean.updateDialog}" />

</h:panelGrid>
</h:form>

</h:body>

</ui:composition>

The actionListener refers to a method in the managed bean class, that will process the submitted form.

To make it work you also need to add some properties in the faces-config.xml:

..

<application>

..

<action-listener>org.primefaces.application.DialogActionListener</action-listener>
<navigation-handler>org.primefaces.application.DialogNavigationHandler</navigation-handler>
<view-handler>org.primefaces.application.DialogViewHandler</view-handler>

....

</application>

...

GitHub: working with the git command line on Windows

This tutorial will allow you to upload your project on the github repository.

I am a linux fan but I have to work with Microsoft Windows. Git is integrated in the Eclipse IDE, but I want to learn to use it by command line, to learn the commands in a better way.

Reality is a bit tougher on the shell. I know about setting SSH keys on Linux. I have already blogged about it on this site, but I have decided to use the Github software provided for Windows.

The steps are the following:

1) install git to run the commands by shell. You can get the installer for Windows at: https://code.google.com/p/msysgit/downloads/list?q=full+installer+official+git

2) download and install github client, that you can find at https://help.github.com/articles/set-up-git

3) run the Github client and login with your github account credentials. The software will create a .ssh folder with your rsa git keys automatically, so you won´t have to worry about passwords and keys. Just use the github software and the provided shell.

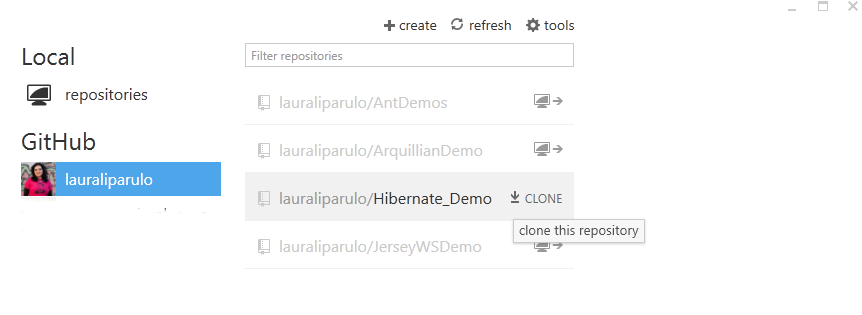
4) create a github repository from the github website or the installed client: for example “Hibernate_Demo” (Github client, figure 1).

Figure 1

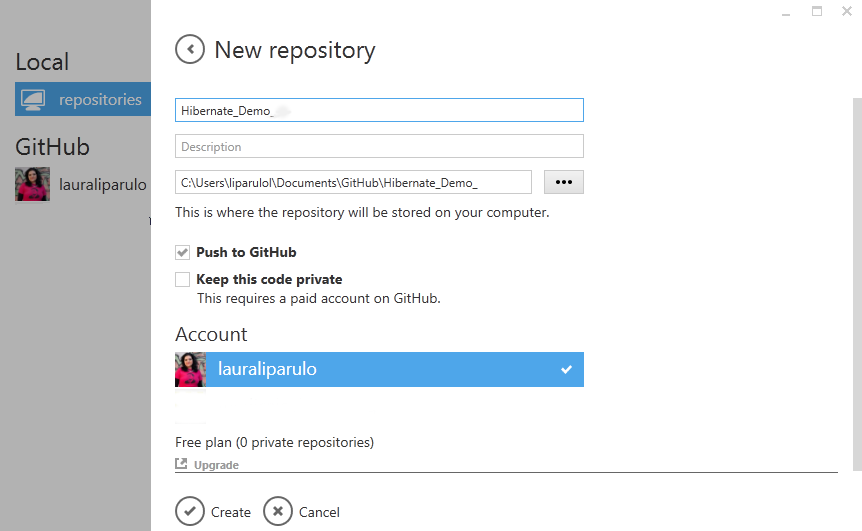
5) clone the project locally (Github client,figure 2).

Figure 2

6) click on the project name in github and openshell by clicking on “tools and options>open shell here” (Github client, figure 3).

Figure 3

7) Navigate on the shell to your project on your desktop. For example:

C:\Users\liparulol\workspace\hb_project>

You can now work on the github shell directly.

8) Run the command “git init” to inizialize a local repository for the hb_project and check the status with “git status”.

9) Run the command “git add *” or “git add .” to tell git to commit all the files and directories in the project folder

10) Commit all the added files, adding a message running: 

git commit -m "Add all content"

You can check your last activity with the “git log” command

11) Add a new remote repository of your project:

git remote add origin git@github.com:lauraliparulo/https://github.com/laurliparulo/Hibernate_Demo.git

12) If the created repository contains file that are not on the local master run:

git merge origin/master

13) The you can finally push your project to the repository with the following command:
git push origin master

You should see the project on the github site. It takes some time to see the changes on your github client locally…

You can also manage your git project by running “gitk", which will open a Python revision browser.

Arquillian testing with Maven in Eclipse: Deployment scenario issue (Glassfish embedded example)

To run a test with Arquillian using Maven you might consider embedded, local or remote containers. You can set them all in your pom.xml file and specify deployment profiles like the following:

 <profile>
			<id>arquillian-glassfish-embedded</id>
			<activation>
				<activeByDefault>true</activeByDefault>
			</activation>
			<dependencies>
				<dependency>
					<groupId>org.jboss.arquillian.container</groupId>
					<artifactId>arquillian-glassfish-embedded-3.1</artifactId>
					<version>1.0.0.CR4</version>
					<scope>test</scope>
				</dependency>
				<dependency>
					<groupId>org.glassfish.main.extras</groupId>
					<artifactId>glassfish-embedded-all</artifactId>
					<version>4.0</version>
					<scope>provided</scope>
				</dependency>

				<dependency>
					<groupId>org.glassfish.jersey.core</groupId>
					<artifactId>jersey-client</artifactId>
					<version>2.4.1</version>
					<scope>provided</scope>
				</dependency>

				<dependency>
					<groupId>org.glassfish.jersey.containers</groupId>
					<artifactId>jersey-container-servlet</artifactId>
					<version>2.4.1</version>
					<scope>provided</scope>
				</dependency>

			</dependencies>
		</profile>

The container must be configured in the arquillian.xml file. A simple one might look like this:

<?xml version="1.0" encoding="UTF-8" standalone="yes"?>
<arquillian xmlns:xsi="http://www.w3.org/2001/XMLSchema-instance"
   xmlns="http://jboss.org/schema/arquillian"
   xsi:schemaLocation="http://jboss.org/schema/arquillian http://jboss.org/schema/arquillian/arquillian_1_0.xsd">
   <!--  this is only needed if you want to override AS7  -->
   <!--  <defaultProtocol type="Servlet 3.0"/> -->
   <container qualifier="arquillian-glassfish-embedded">
   	<configuration>
   		<property name="bindHttpPort">9090</property>
   	</configuration>
   </container>
   <!-- 
   <container qualifier="tomcat">
   	<configuration>
   		<property name="user">tomcat</property>
   		<property name="pass">tomcat</property>
   	</configuration>
   </container>
    -->
</arquillian>

Setting the container in the pom.xml and the arquillian.xml files is not enough to run the test in Eclipse.
You would get the following error:

org.jboss.arquillian.container.test.impl.client.deployment.ValidationException: DeploymentScenario contains a target (_DEFAULT_) not matching any defined Container in the registry.
Please include at least 1 Deployable Container on your Classpath.
          at org.jboss.arquillian.container.test.impl.client.deployment.DeploymentGenerator.throwNoContainerFound(DeploymentGenerator.java:250)
          at org.jboss.arquillian.container.test.impl.client.deployment.DeploymentGenerator.throwTargetNotFoundValidationException(DeploymentGenerator.java:243)
          at org.jboss.arquillian.container.test.impl.client.deployment.DeploymentGenerator.validate(DeploymentGenerator.java:102)
          at org.jboss.arquillian.container.test.impl.client.deployment.DeploymentGenerator.generateDeployment(DeploymentGenerator.java:84)
          at sun.reflect.NativeMethodAccessorImpl.invoke0(Native Method)
          at sun.reflect.NativeMethodAccessorImpl.invoke(NativeMethodAccessorImpl.java:39)
          at sun.reflect.DelegatingMethodAccessorImpl.invoke(DelegatingMethodAccessorImpl.java:25)
          at java.lang.reflect.Method.invoke(Method.java:597)
          at org.jboss.arquillian.core.impl.ObserverImpl.invoke(ObserverImpl.java:94)
          at org.jboss.arquillian.core.impl.EventContextImpl.invokeObservers(EventContextImpl.java:99)
          at org.jboss.arquillian.core.impl.EventContextImpl.proceed(EventContextImpl.java:81)
          at org.jboss.arquillian.core.impl.ManagerImpl.fire(ManagerImpl.java:135)
          at org.jboss.arquillian.core.impl.ManagerImpl.fire(ManagerImpl.java:115)
          at org.jboss.arquillian.core.impl.EventImpl.fire(EventImpl.java:67)
…

To make the test run you need to set the active maven profiles in Eclipse. Simply right click on the project and select Properties>Maven and add “arquillian-glassfish-embedded” in the Active maven profiles textbox.

JAXB part 7: increase performance with singleton JaxbContext instance

Currently I am developing an application to rename some jboss configuration content.
Using JAXB, I had made marshalling and unmarshalling methods, creating a new JAXBcontext instance each time the single methods were invoked (for each xml file!).
The application was incredibly slow. Taking up to 45 minutes to complete the tasks.
Then I have discovered that I could make it all in less than 30% of the time, by using a singleton design pattern to reuse a single instance of the JAXBContext.

All you need to do is:
1) creating a singleton class to instance the context
2) use it in your marshalling/unmarshalling method.

The singleton class is like this:

import javax.xml.bind.DataBindingException;
import javax.xml.bind.JAXBContext;
import javax.xml.bind.JAXBException;
import javax.xml.bind.Marshaller;
import javax.xml.bind.Unmarshaller;

import com.nexus.pacs.conf.xmdesc.Mbean;

import java.io.IOException;
import java.io.Reader;
import java.io.Writer;

public class MbeanJAXBContext {

	private static JAXBContext instance;

	public XmdescJAXBContext() {
	}

	public static synchronized JAXBContext initContext() {
		try {
			if (instance == null)
				instance = JAXBContext.newInstance(Mbean.class);
		} catch (JAXBException e) {
			// TODO Auto-generated catch block
			e.printStackTrace();
		}
		return instance;
	}

}

I am using the synchronized keyword to make it thread safe.
Then you can instance your context like this:

public static void marshaller(Mbean mbean, String filePath)
			throws CustomizerException {

	StringWriter stringWriter = new StringWriter();
	String xmlContent;
	File file = new File(filePath);

	try {
		xmlContent = FileUtils.readFileToString(file, "UTF-8");
		FileWriter fileWriter = new FileWriter(file);
		XmdescJAXBContext jaxbHelper = new XmdescJAXBContext();
		JaxbContext jaxbContext= jaxbHelper.initContext();
		Marshaller marshaller = jaxbContext.createMarshaller();

                marshaller.setProperty(Marshaller.JAXB_FORMATTED_OUTPUT, true);
			marshaller.setProperty(Marshaller.JAXB_FRAGMENT, true);

		marshaller.setProperty(CharacterEscapeHandler.class.getName(),
					new XmlCharacterHandler());

		 synchronized(marshaller){
		     marshaller.marshal(mbean, stringWriter);
		    }
		
	xmlContent = XmdescContentHandler.addEntityReferences(xmlContent,
					stringWriter.toString());
		fileWriter.write(xmlContent);

		fileWriter.flush();
		fileWriter.close();

		} catch (MarshalException e) {

		throw new CustomizerException("Marshalling the file: " + filePath
					+ "not possible. Wrong file content");

		} catch (JAXBException e) {

		throw new CustomizerException("Could not parse the XML file: "
					+ filePath);

		} catch (IOException e) {

		throw new CustomizerException("Could not access the file: "
					+ filePath);
		}

	}

Awfully I have also noticed that with Ubuntu 12.04, with the singleton instance, the application now takes just a minute to run, while with Windows 7 it still takes 16 minutes. Long live Linux!

You can find a post about the Character Handler in this blog. Have fun!

JAXB part 5: XML Character handler

With JAXB you need to dhandle special characters you can just choose between two options.

Otherwise you need to define your own character handler.

The following class shows you how to handle both CDATA elements and special characters.

import java.io.IOException;
import java.io.StringWriter;
import java.io.Writer;

import com.sun.xml.bind.marshaller.CharacterEscapeHandler;

public class XmlCharacterHandler implements CharacterEscapeHandler {

	public void escape(char[] buf, int start, int len, boolean isAttValue,
			Writer out) throws IOException {
		StringWriter buffer = new StringWriter();

		for (int i = start; i < start + len; i++) {
			buffer.write(buf[i]);
		}

		String st = buffer.toString();

		if (!st.contains("CDATA")) {
			st = buffer.toString().replace("&", "&amp;").replace("<", "&lt;")
					.replace(">", "&gt;").replace("'", "&apos;")
					.replace("\"", "&quot;");

		}
		out.write(st);
//		System.out.println(st);
	}

}

In your marshaller method just add the following property:

	marshaller.setProperty(CharacterEscapeHandler.class.getName(),
					new XmlCharacterHandler());

We use cookies to personalise content and ads, to provide social media features and to analyse our traffic. We also share information about your use of our site with our social media, advertising and analytics partners.
Cookies settings
Accept
Privacy & Cookie policy
Privacy & Cookies policy
Cookie name Active

Privacy Policy

What information do we collect?

We collect information from you when you register on our site or place an order. When ordering or registering on our site, as appropriate, you may be asked to enter your: name, e-mail address or mailing address.

What do we use your information for?

Any of the information we collect from you may be used in one of the following ways: To personalize your experience (your information helps us to better respond to your individual needs) To improve our website (we continually strive to improve our website offerings based on the information and feedback we receive from you) To improve customer service (your information helps us to more effectively respond to your customer service requests and support needs) To process transactions Your information, whether public or private, will not be sold, exchanged, transferred, or given to any other company for any reason whatsoever, without your consent, other than for the express purpose of delivering the purchased product or service requested. To administer a contest, promotion, survey or other site feature To send periodic emails The email address you provide for order processing, will only be used to send you information and updates pertaining to your order.

How do we protect your information?

We implement a variety of security measures to maintain the safety of your personal information when you place an order or enter, submit, or access your personal information. We offer the use of a secure server. All supplied sensitive/credit information is transmitted via Secure Socket Layer (SSL) technology and then encrypted into our Payment gateway providers database only to be accessible by those authorized with special access rights to such systems, and are required to?keep the information confidential. After a transaction, your private information (credit cards, social security numbers, financials, etc.) will not be kept on file for more than 60 days.

Do we use cookies?

Yes (Cookies are small files that a site or its service provider transfers to your computers hard drive through your Web browser (if you allow) that enables the sites or service providers systems to recognize your browser and capture and remember certain information We use cookies to help us remember and process the items in your shopping cart, understand and save your preferences for future visits, keep track of advertisements and compile aggregate data about site traffic and site interaction so that we can offer better site experiences and tools in the future. We may contract with third-party service providers to assist us in better understanding our site visitors. These service providers are not permitted to use the information collected on our behalf except to help us conduct and improve our business. If you prefer, you can choose to have your computer warn you each time a cookie is being sent, or you can choose to turn off all cookies via your browser settings. Like most websites, if you turn your cookies off, some of our services may not function properly. However, you can still place orders by contacting customer service. Google Analytics We use Google Analytics on our sites for anonymous reporting of site usage and for advertising on the site. If you would like to opt-out of Google Analytics monitoring your behaviour on our sites please use this link (https://tools.google.com/dlpage/gaoptout/)

Do we disclose any information to outside parties?

We do not sell, trade, or otherwise transfer to outside parties your personally identifiable information. This does not include trusted third parties who assist us in operating our website, conducting our business, or servicing you, so long as those parties agree to keep this information confidential. We may also release your information when we believe release is appropriate to comply with the law, enforce our site policies, or protect ours or others rights, property, or safety. However, non-personally identifiable visitor information may be provided to other parties for marketing, advertising, or other uses.

Registration

The minimum information we need to register you is your name, email address and a password. We will ask you more questions for different services, including sales promotions. Unless we say otherwise, you have to answer all the registration questions. We may also ask some other, voluntary questions during registration for certain services (for example, professional networks) so we can gain a clearer understanding of who you are. This also allows us to personalise services for you. To assist us in our marketing, in addition to the data that you provide to us if you register, we may also obtain data from trusted third parties to help us understand what you might be interested in. This ‘profiling’ information is produced from a variety of sources, including publicly available data (such as the electoral roll) or from sources such as surveys and polls where you have given your permission for your data to be shared. You can choose not to have such data shared with the Guardian from these sources by logging into your account and changing the settings in the privacy section. After you have registered, and with your permission, we may send you emails we think may interest you. Newsletters may be personalised based on what you have been reading on theguardian.com. At any time you can decide not to receive these emails and will be able to ‘unsubscribe’. Logging in using social networking credentials If you log-in to our sites using a Facebook log-in, you are granting permission to Facebook to share your user details with us. This will include your name, email address, date of birth and location which will then be used to form a Guardian identity. You can also use your picture from Facebook as part of your profile. This will also allow us and Facebook to share your, networks, user ID and any other information you choose to share according to your Facebook account settings. If you remove the Guardian app from your Facebook settings, we will no longer have access to this information. If you log-in to our sites using a Google log-in, you grant permission to Google to share your user details with us. This will include your name, email address, date of birth, sex and location which we will then use to form a Guardian identity. You may use your picture from Google as part of your profile. This also allows us to share your networks, user ID and any other information you choose to share according to your Google account settings. If you remove the Guardian from your Google settings, we will no longer have access to this information. If you log-in to our sites using a twitter log-in, we receive your avatar (the small picture that appears next to your tweets) and twitter username.

Children’s Online Privacy Protection Act Compliance

We are in compliance with the requirements of COPPA (Childrens Online Privacy Protection Act), we do not collect any information from anyone under 13 years of age. Our website, products and services are all directed to people who are at least 13 years old or older.

Updating your personal information

We offer a ‘My details’ page (also known as Dashboard), where you can update your personal information at any time, and change your marketing preferences. You can get to this page from most pages on the site – simply click on the ‘My details’ link at the top of the screen when you are signed in.

Online Privacy Policy Only

This online privacy policy applies only to information collected through our website and not to information collected offline.

Your Consent

By using our site, you consent to our privacy policy.

Changes to our Privacy Policy

If we decide to change our privacy policy, we will post those changes on this page.
Save settings
Cookies settings