package main

import "fmt"

func main() {

	//variable lenght arrays
	slice := []int{1, 2, 3, 4}

	slice = append(slice, 4)

	fmt.Println(slice)

	//fixed lenght arrays
	fixed_slice := [4]int{1, 2, 3, 4}
	//cannot append another element - compiler error!
	//fixed_slice = append(slice, 4)

	fmt.Println(fixed_slice)

	//another way to define a slice
	another_slice := make([]int, 10)

	//initially filled with zeros
	fmt.Println(another_slice)

	//add a different number in the first position
	another_slice[0] = 45

	fmt.Println(another_slice)
}
Golang also uses pointers, but it doesn’ need any memory allocation code or anything.
It’s very straightforward.
The ampersand & creates a pointer, and the asteryx * allows you to get the value referenced by the pointer.
Simply:
package main

import (
	"fmt"
)

func main() {
	s := "this is a string"

	string_pointer := &s

	fmt.Println(s)

	//reference the pointer with asteryx
	fmt.Println("reference by pointer: ", *string_pointer)
	//reference the pointer with asteryx
	fmt.Println("address: ", string_pointer)
}
import (
	"fmt"
	"os"
	"strconv"
)

func main() {

	var sum int

	//exclude for argument from Args
	for _, a := range os.Args[1:] {

		i, err := strconv.Atoi(a)

		if err != nil {
			panic(fmt.Sprintf("Invalid value : %v", err))
		}

		sum += i

	}

	fmt.Printf("Sum = %v\n", sum)

}
As you can see, if you run the code with string parameters you get an error:
go run error_handling.go 1 a c
Then you get:
panic: Invalid value : strconv.Atoi: parsing "a": invalid syntax

goroutine 1 [running]:
main.main()
        C:/Users/lliparul/Desktop/go/3_ERROR_HANDLING/error_handling.go:19 +0x159
exit status 2
Inspired by the course “Getting started with Go Programming Language” by Matthew Spaulding (Packt Publishing)
Go was developed by some developers at Google and meant to be a better system programming language than C and C++.
It’s compiled and not interpreted.
It’s fast and suitable for concurrency.
Go uses vendoring for depedepency management. It means that the cofe of the dependencies is included in the project, once the dependency is downloaded.
Hello world program
A simple Hello world program (a file called “hello_world.go”) looks like this:
package main

import "fmt"

func main() {
	fmt.Println("Hello, World!")
}
As you can see the main function is the entry point to run golang applications.
Once golang is installed on your machine, you can simply run:
go run hello_world.go
The package fmt is a fundamental library to deal with strings, etc.
Assignments, data types, control structures
To assign values, columns and equal simbols are used. You can use data types like int, but also omit them.
a := 5
var b int = 4
Strings always use double quotes.
fmt.Println("a is negative!")
Of course you have conditional clauses like, if and switch:
if a < 0 {
		fmt.Println("a is negative!")
	} else if a > b {
		fmt.Println("a is bigger than b")
	}

switch a {
	case 10:
		fmt.Println("It's 10")
	case 5:
		fmt.Print("It's five")
	}
And three types of for loops.
Simple loop:
	for i := 0; i < 4; i++ {
		for i := 0; i < 4; i++ {
		fmt.Println(i)
	}
Range loop:
for _, i := range []int{1, 2, 3, 4} {
		fmt.Println(i)
	}
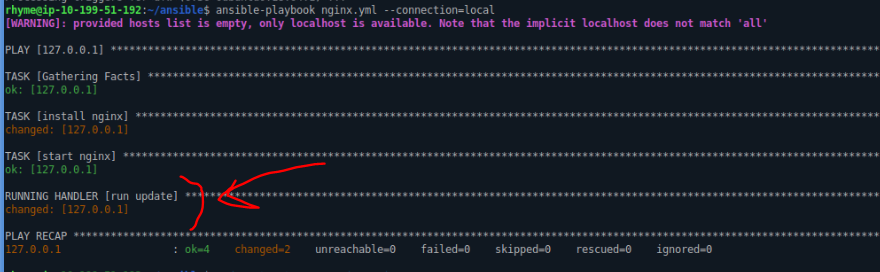
Using Handlers, we can create tasks in Ansible that can be executed only if a change occurs on the machine.
Let’s get back to the nginx playbook used in the previous article and modify the installtion task, by adding the handler for the update, to be executed if there is a new nginx version, when apt-get update is run on the linux machine:
To run one of the Docker official image, you can simply use “docker run”:
$ docker run centos
The first time you run it, the image can´t be found and must be downloaded:
Once downloaded, the image is saved in the docker cache and can be reused if necessary.
If it´s an official image, you would only need to enter the image name only.
But it´s taken from a user´s repo the format is: <username>/<image>.
The 100% Free software linux image Trisquel, for example, is taken from the repository of a user called “kpengboy“.
In this case, even if you are logged in, you can´t run “docker run”. You need to pull it first:
$docker pull kpengboy/trisquelbash
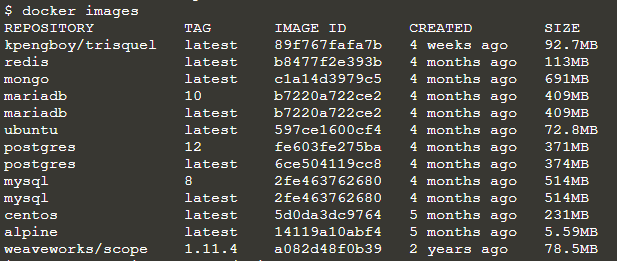
To see the list of the images donwload so far, run:
$ docker images
If you also want to start a bash in the container, use “-it” for the interactive mode:
$ docker run -it kpengboy/trisquel
Then you can work with the bash shell:
As default, docker will download the latest version available, but you can additionally specify a version (called “tag”) you want to work with:
$ docker run redis:4.0
If you want to access a webapp or, for example, a database, you generally get an assigned url with a port number. But you can change the ports, by adding them as parameters.
For example, if you want to run mysql and access it at a different port than 3306, use the “-p” option to give <host>:<container-port>:
$ docker run -p 52000:3307 mysql
To persist your data, even when the container is killed, you can mount a persistent volume with “-v”:
$ docker run -v /opt/data/mysql mysql
You can pass an environment variable to you container, which might help you to avoid modifying the image and achieve some strategic solution:
$ docker run -e BACKGROUND_COLOR simple-web-app
To see which containers are running:
$ docker ps
To see the stopped containers to
$ docker ps -a
If you want to get the details of a specific container:
$ docker inspect vibrant_chatelet
You can check the log by running:
$ docker logs vibrant_chatelet
You can start a container in background mode with the “-d” option:
$ docker -d kpengboy/trisquel
To remove a container (even if it´s running)
$ docker rm vibrant_chatelet
Or by containerID
$ docker rm 0d6d64f9053c
To remove the image you need to make sure that no container is running it first. You migh use “docker stop” or just remove it directly.
NodePort and Load balancer are used to expose the service outside the cluster In addition to creating the ClusterIp, this will allocate a port in the range 30000-32767 on every node of the cluster, to route to the clusterIP. For example:
If you don´t specify the target port, a a random port will be used.
Exposed services automatically register with the Kubernetes internal DNS, which make it easier to access them by names rather than IPs. You can get the url by using nslookup, like:
$ kubectl exec -it busybox2 --nslookup nginx
HEADLESS SERVICE
If you put in the spec “clusterIp” as “none”, you get a headless service. It is possible to create a service grouping that does not allocate an IP address or forward traffic, if there is a reason that you want to definitively control what specific pods you connect and communicate with. This kind of service is called a headless service. You can request this setup by explicitly setting ClusterIP to None within the service definition:
For these kind of services, DNS entries will be created that point to the Pods backing the service, and that DNS will be automatically updated as Pods matching the selector come online (or disappear).
ENDPOINT
You can expose a remote system as a service internally by creating an endpoint for it.
For example, if you had a remote TCP service running on the internet at port 1976 at the IP address 1.2.3.4, you could define a Service and Endpoint to reference that external-to-kubernetes system:
Now we can use that name to ask kubectl to set up a proxy that will forward all traffic from a local port we specify to a port associated with the Pod we determine.
$ kubectl port-forward flask-1599974757-b68pw 5000:5000

Forwarding from 127.0.0.1:5000 -> 5000
Forwarding from [::1]:5000 -> 5000
This is forwarding any and all traffic that gets created on your local machine at TCP port 5000 to TCP port 5000 on the Pod flask-1599974757-b68pw.
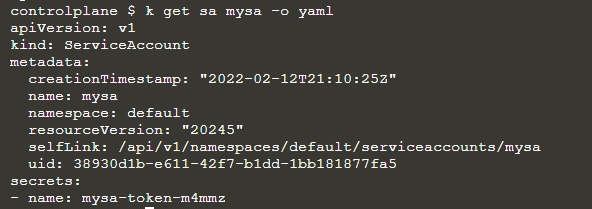
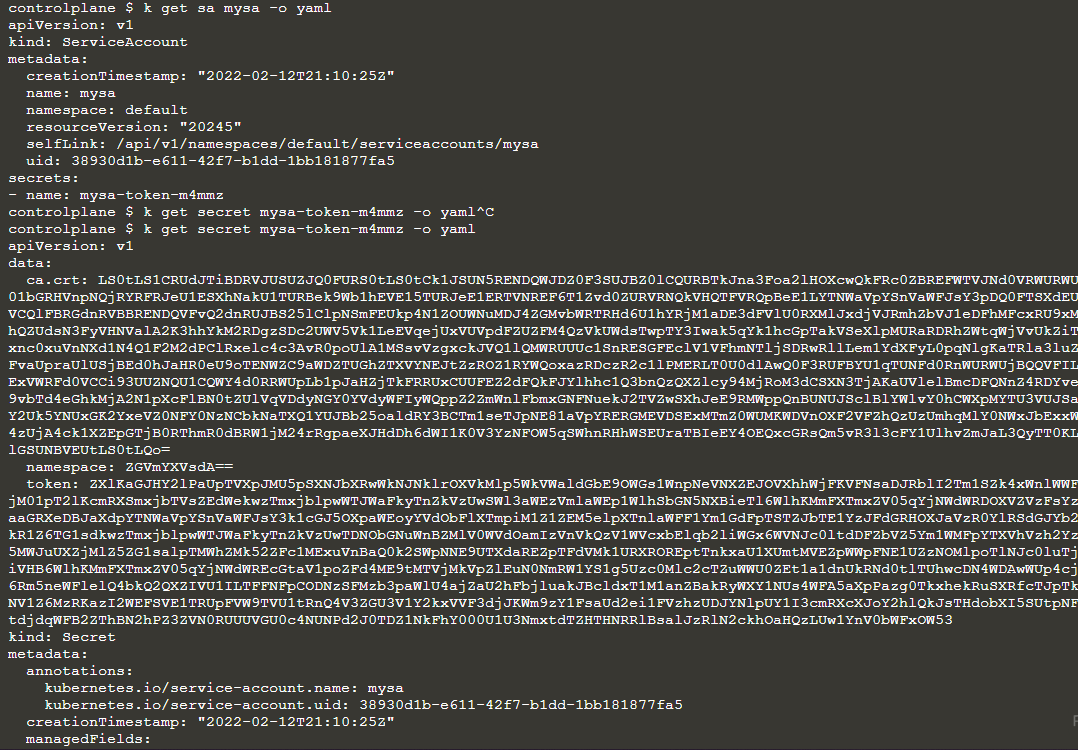
If we inspect the service account, we can find the name of the secret we are using:
Then we can inpect the token by running:
$ kubectl get secret my-sa-token-m4mmz -o yaml
In the token section, we can see the secret encoded in base64. To read it in clear text simply:
$ echo <tokenstring> | base64 -d
We use cookies to personalise content and ads, to provide social media features and to analyse our traffic. We also share information about your use of our site with our social media, advertising and analytics partners.
Cookies settings
Accept
Privacy & Cookie policy
Privacy & Cookies policy
Cookies list
Cookie name
Active
Privacy Policy
What information do we collect?
We collect information from you when you register on our site or place an order.
When ordering or registering on our site, as appropriate, you may be asked to enter your: name, e-mail address or mailing address.
What do we use your information for?
Any of the information we collect from you may be used in one of the following ways:
To personalize your experience
(your information helps us to better respond to your individual needs)
To improve our website
(we continually strive to improve our website offerings based on the information and feedback we receive from you)
To improve customer service
(your information helps us to more effectively respond to your customer service requests and support needs)
To process transactions
Your information, whether public or private, will not be sold, exchanged, transferred, or given to any other company for any reason whatsoever, without your consent, other than for the express purpose of delivering the purchased product or service requested.
To administer a contest, promotion, survey or other site feature
To send periodic emails
The email address you provide for order processing, will only be used to send you information and updates pertaining to your order.
How do we protect your information?
We implement a variety of security measures to maintain the safety of your personal information when you place an order or enter, submit, or access your personal information.
We offer the use of a secure server. All supplied sensitive/credit information is transmitted via Secure Socket Layer (SSL) technology and then encrypted into our Payment gateway providers database only to be accessible by those authorized with special access rights to such systems, and are required to?keep the information confidential.
After a transaction, your private information (credit cards, social security numbers, financials, etc.) will not be kept on file for more than 60 days.
Do we use cookies?
Yes (Cookies are small files that a site or its service provider transfers to your computers hard drive through your Web browser (if you allow) that enables the sites or service providers systems to recognize your browser and capture and remember certain information
We use cookies to help us remember and process the items in your shopping cart, understand and save your preferences for future visits, keep track of advertisements and compile aggregate data about site traffic and site interaction so that we can offer better site experiences and tools in the future. We may contract with third-party service providers to assist us in better understanding our site visitors. These service providers are not permitted to use the information collected on our behalf except to help us conduct and improve our business.
If you prefer, you can choose to have your computer warn you each time a cookie is being sent, or you can choose to turn off all cookies via your browser settings. Like most websites, if you turn your cookies off, some of our services may not function properly. However, you can still place orders by contacting customer service.
Google Analytics
We use Google Analytics on our sites for anonymous reporting of site usage and for advertising on the site. If you would like to opt-out of Google Analytics monitoring your behaviour on our sites please use this link (https://tools.google.com/dlpage/gaoptout/)
Do we disclose any information to outside parties?
We do not sell, trade, or otherwise transfer to outside parties your personally identifiable information. This does not include trusted third parties who assist us in operating our website, conducting our business, or servicing you, so long as those parties agree to keep this information confidential. We may also release your information when we believe release is appropriate to comply with the law, enforce our site policies, or protect ours or others rights, property, or safety. However, non-personally identifiable visitor information may be provided to other parties for marketing, advertising, or other uses.
Registration
The minimum information we need to register you is your name, email address and a password. We will ask you more questions for different services, including sales promotions. Unless we say otherwise, you have to answer all the registration questions.
We may also ask some other, voluntary questions during registration for certain services (for example, professional networks) so we can gain a clearer understanding of who you are. This also allows us to personalise services for you.
To assist us in our marketing, in addition to the data that you provide to us if you register, we may also obtain data from trusted third parties to help us understand what you might be interested in. This ‘profiling’ information is produced from a variety of sources, including publicly available data (such as the electoral roll) or from sources such as surveys and polls where you have given your permission for your data to be shared. You can choose not to have such data shared with the Guardian from these sources by logging into your account and changing the settings in the privacy section.
After you have registered, and with your permission, we may send you emails we think may interest you. Newsletters may be personalised based on what you have been reading on theguardian.com. At any time you can decide not to receive these emails and will be able to ‘unsubscribe’.
Logging in using social networking credentials
If you log-in to our sites using a Facebook log-in, you are granting permission to Facebook to share your user details with us. This will include your name, email address, date of birth and location which will then be used to form a Guardian identity. You can also use your picture from Facebook as part of your profile. This will also allow us and Facebook to share your, networks, user ID and any other information you choose to share according to your Facebook account settings. If you remove the Guardian app from your Facebook settings, we will no longer have access to this information.
If you log-in to our sites using a Google log-in, you grant permission to Google to share your user details with us. This will include your name, email address, date of birth, sex and location which we will then use to form a Guardian identity. You may use your picture from Google as part of your profile. This also allows us to share your networks, user ID and any other information you choose to share according to your Google account settings. If you remove the Guardian from your Google settings, we will no longer have access to this information.
If you log-in to our sites using a twitter log-in, we receive your avatar (the small picture that appears next to your tweets) and twitter username.
We are in compliance with the requirements of COPPA (Childrens Online Privacy Protection Act), we do not collect any information from anyone under 13 years of age. Our website, products and services are all directed to people who are at least 13 years old or older.
Updating your personal information
We offer a ‘My details’ page (also known as Dashboard), where you can update your personal information at any time, and change your marketing preferences. You can get to this page from most pages on the site – simply click on the ‘My details’ link at the top of the screen when you are signed in.
Online Privacy Policy Only
This online privacy policy applies only to information collected through our website and not to information collected offline.
Your Consent
By using our site, you consent to our privacy policy.
Changes to our Privacy Policy
If we decide to change our privacy policy, we will post those changes on this page.