
Container probes allows you to test the health of your pods through a generic mechanism, that you can configure and execute according to your needs.
There are three types of probes:
- exec – a command executing, expected to return 0 as exit value
- httpGet – a request expected to return 200
- tcpSocket – for successful connectivity
And two categories:
- liveness probe – to check the health of the running application
- readiness probe – to check if the application is ready to start working
Liveness probe
If you define a liveness probe, you basically will add a command to check if the pod is working as expected. If not, a restartPolicy can be defined.
The three types of liveness probes are:
- ExecAction: a command within the Pod to get a response. A result of anything other than 0 represents a failure.
- TCPSocketAction: it consists of trying to open a socket, without doing anything else. If the socket opens, the probe is successful, and if it fails (after a timeout), the probe fails.
- HTTPGetAction: Similar to the socket option, this makes an HTTP connection to your Pod as a URI specified, and the response code of the HTTP request is what is used to determine the success/failure of the liveness probe.
The restart Policy can have the following values
- Always (default)
- OnFailure
- Never
The restartPolicy can be found under spec.template.spec:
apiVersion: batch/v1
kind: Deployment
metadata:
 name: my-dep
spec:
 template:
   metadata:
     name: my-dep-template
    spec:
     containers:
     - name: my-container
       image: busybox
       command: ["echo", "this is my container!"]
     restartPolicy: OnFailure
Kubernetes keeps track about how often a restart occurs and will slow down the frequency of restarts if they are happening in quick succession, capped at a maximum of five minutes between restart attempts.
The number of restarts can be inspected in the “restartcount" in the output of kubectl describe, and also in the yaml file in the status section.
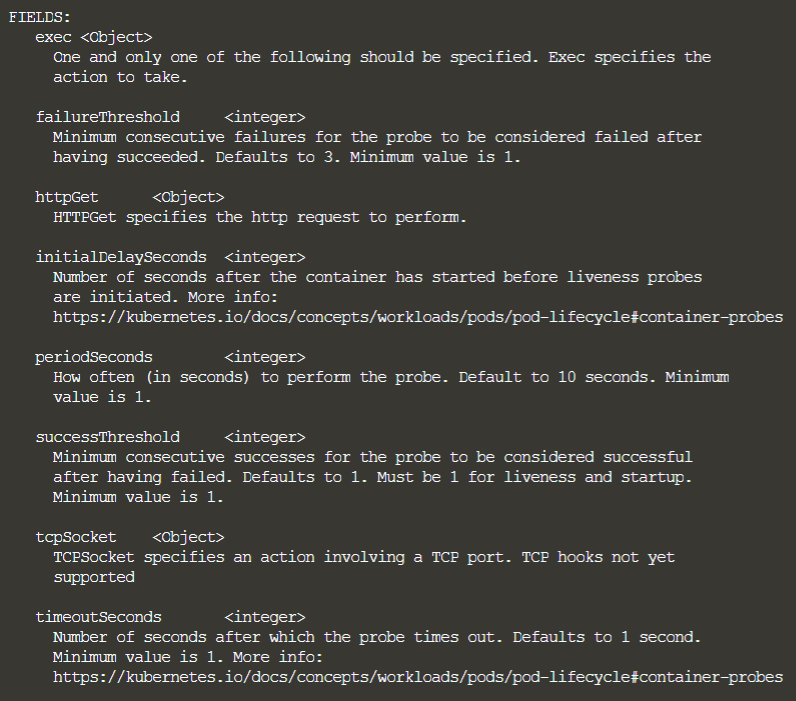
If you want to inspect the fields you can configure under “livenessProbe you can run:
$ k explain deployment.spec.template.spec.containers.livenessProbe
If you are using an HTTP-based probe, you have a number of additional variables that can be defined while making the HTTP request:
- host: Defaults to the Pod IP address.
- scheme: HTTP or https. Kubernetes 1.8 defaults to HTTP
- path: Path of the URI request.
- HttpHeaders: Any custom headers to be included in the request.
- port: Port on which to make the HTTP request.
So a httpGet liveness probe might loook like
livenessProbe:
        httpGet:
          path: /checkalive
          port: 8888
          httpHeaders:
          - name: X-Custom-Header
            value: ItsAlive
        initialDelaySeconds: 30
        timeoutSeconds: 10
Readiness probe
Readiness probes are generally necessary if your container depends on other things that might be unavailable at the beginning (like a database service not started yet).
When a readiness probe fails for a container, the container’s pod will be removed from any service endpoint it is registered with.
Here is a sample readiness probe with the “exec” command:
readinessProbe:
  exec:
    command:
        - /usr/local/bin/checkdb
        - --full-check
        - --data-service=my-data-service
  initialDelaySeconds: 60
  timeoutSeconds: 5
PUTTING THE PROBES IN THE MANIFEST
It is fine to have both a readiness probe and a liveness probe on the same container as they serve different purposes.
You can add them under spec.containers:
apiVersion: apps/v1beta1
kind: Deployment
metadata:
  name: flask
  labels:
  run: flask
spec:
  template:
    metadata:
      labels:
        app: flask
    spec:
      containers:
      - name: flask
        image: quay.io/kubernetes-for-developers/flask:0.3.0
        imagePullPolicy: Always
        ports:
        - containerPort: 5000
        envFrom:
        - configMapRef:
          name: flask-config
        volumeMounts:
        - name: config
          mountPath: /etc/flask-config
          readOnly: true
        livenessProbe:
          httpGet:
            path: /alive
            port: 5000
          initialDelaySeconds: 1
          periodSeconds: 5
        readinessProbe:
          httpGet:
            path: /ready
            port: 5000
          initialDelaySeconds: 5
          periodSeconds: 5
        volumes:
        - name: config
          configMap:
            name: flask-config