Data Science with Java – Part 2: CSV data into charts

A nice java library called opencsv allows you to import the csv file content and make charts out of it.

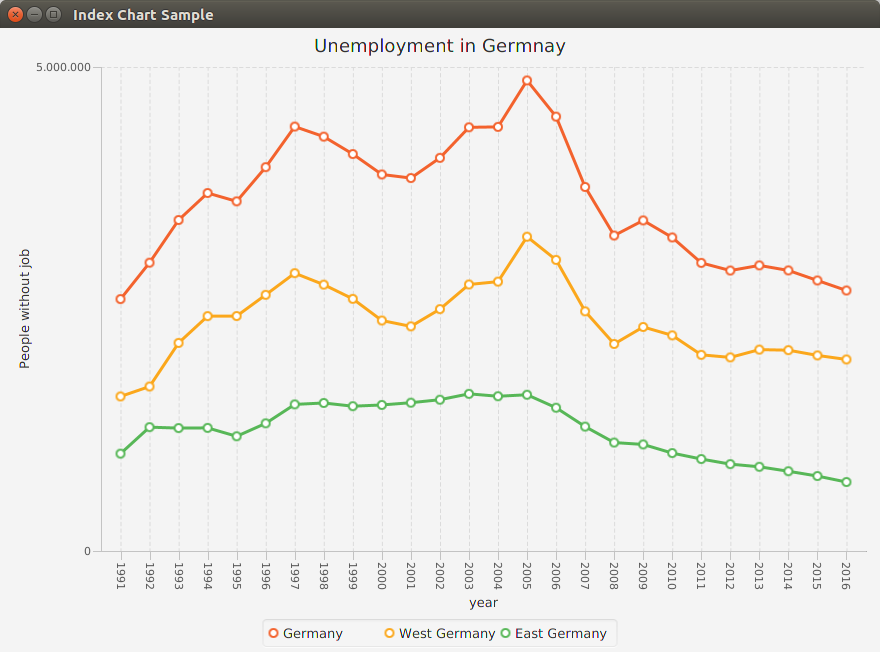
Let´s consider for example unemployment in Germany since the reunification. We will use a csv file containing year, amount of people in germany, west and east (four columns)

1991,2602203,1596457,1005745
1992,2978570,1699273,1279297
1993,3419141,2149465,1269676
1994,3698057,2426276,1271781
1995,3611921,2427083,1184838
1996,3965064,2646442,1318622
1997,4384456,2870021,1514435
1998,4280630,2751535,1529095
1999,4100499,2604720,1495779
2000,3889695,2380987,1508707
2001,3852564,2320500,1532064
2002,4061345,2498392,1562953
2003,4376795,2753181,1623614
2004,4381281,2782759,1598522
2005,4860909,3246755,1614154
2006,4487305,3007158,1480146
2007,3760586,2475528,1285058
2008,3258954,2138778,1120175
2009,3414992,2314215,1100777
2010,3238965,2227473,1011492
2011,2976488,2026545,949943
2012,2897126,1999918,897209
2013,2950338,2080342,869995
2014,2898388,2074553,823835
2015,2794664,2020503,774162
2016,2690975,1978672,712303

We can represent it with an index chart by using just JavaFX and the opencsv library:

package de.datascience.charts;

import java.io.FileReader;

import com.opencsv.CSVReader;

import javafx.application.Application;
import javafx.scene.Scene;
import javafx.scene.chart.CategoryAxis;
import javafx.scene.chart.LineChart;
import javafx.scene.chart.NumberAxis;
import javafx.scene.chart.ScatterChart;
import javafx.scene.chart.XYChart;
import javafx.stage.Stage;

public class UnemploymentGermany extends Application {

	@Override
	public void start(Stage stage) throws Exception {
		stage.setTitle("Index Chart Sample");
		final NumberAxis yAxis = new NumberAxis(0, 5000000, 1);
		final CategoryAxis xAxis = new CategoryAxis();

		final LineChart<String, Number> lineChart = new LineChart<>(xAxis, yAxis);
		yAxis.setLabel("People without job");
		xAxis.setLabel("year");
		lineChart.setTitle("Unemployment in Germnay");

		XYChart.Series series = new XYChart.Series();
		XYChart.Series seriesWest = new XYChart.Series();
		XYChart.Series seriesEast = new XYChart.Series();
		
		series.setName("Germany");
		seriesWest.setName("West Germany");
		seriesEast.setName("East Germany");
		
		try (CSVReader dataReader = new CSVReader(new FileReader("docs/unemployment_germany.csv"))) {
			String[] nextLine;
			while ((nextLine = dataReader.readNext()) != null) {
				String year = String.valueOf(nextLine[0]);
				int population = Integer.parseInt(nextLine[1]);
				series.getData().add(new XYChart.Data(year, population));
				int populationWest = Integer.parseInt(nextLine[2]);
				;
				seriesWest.getData().add(new XYChart.Data(year, populationWest));
				int populationEast = Integer.parseInt(nextLine[3]);
				seriesEast.getData().add(new XYChart.Data(year, populationEast));
			}
		}

		lineChart.getData().addAll(series, seriesWest, seriesEast);
		Scene scene = new Scene(lineChart, 500, 400);
		stage.setScene(scene);
		stage.show();
	}

	public static void main(String[] args) {
		launch(args);
	}
}

The output will be the following:

Data Science with Java – Part 1: bar charts with FX

This year some books about using Java for Data science have been released and I am very happy about it!!! It doesn´t have to be Python at any cost.

Let´s dive into this new Java adventure. 🙂

Some basic visualization can be achieved with some FX classes, that can be found in the “javafx.scene.chart” package.

The following code will create a bar chart about the the Shares of Expenditures in 4 countries by category:

package de.datascience.charts;

import javafx.application.Application;
import javafx.scene.Scene;
import javafx.scene.chart.BarChart;
import javafx.scene.chart.CategoryAxis;
import javafx.scene.chart.NumberAxis;
import javafx.scene.chart.XYChart;
import javafx.stage.Stage;

public class ExpendituresShares extends Application {

    final static String FOOD = "Food";
    final static String HOUSING = "Housing";
    final static String TRANSPORTATION = "Transportation";
    final static String HEALTHCARE = "Health care";
    final static String CLOTHING = "Clothing";
    
    final static String USA="U.S.A.";
    final static String UK="United Kingdom";
    final static String CANADA="Canada";
    final static String JAPAN="Japan";

    final CategoryAxis xAxis = new CategoryAxis();
    final NumberAxis yAxis = new NumberAxis();

    final XYChart.Series<String, Number> usaSeries = new XYChart.Series<>();
    final XYChart.Series<String, Number> canadaSeries2 = new XYChart.Series<>();
    final XYChart.Series<String, Number> ukSeries = new XYChart.Series<>();
    final XYChart.Series<String, Number> japanSeries = new XYChart.Series<>();

    public void simpleBarChartByCountry(Stage stage) {
        stage.setTitle("Bar Chart");
        final BarChart<String, Number> barChart
                = new BarChart<>(xAxis, yAxis);
        barChart.setTitle("Shares of expenditures by Country");
        xAxis.setLabel("Category");
        yAxis.setLabel("Percentage");

        usaSeries.setName(USA);
        addDataItem(usaSeries, FOOD, 14);
        addDataItem(usaSeries, HOUSING, 26);
        addDataItem(usaSeries, TRANSPORTATION, 17);
        addDataItem(usaSeries, HEALTHCARE, 8);
        addDataItem(usaSeries, CLOTHING, 4);

        canadaSeries2.setName(CANADA);
        addDataItem(canadaSeries2, FOOD, 15);
        addDataItem(canadaSeries2, HOUSING, 21);
        addDataItem(canadaSeries2, TRANSPORTATION, 20);
        addDataItem(canadaSeries2, HEALTHCARE, 7);
        addDataItem(canadaSeries2, CLOTHING, 6);

        ukSeries.setName(UK);
        addDataItem(ukSeries, FOOD, 20);
        addDataItem(ukSeries, HOUSING, 24);
        addDataItem(ukSeries, TRANSPORTATION, 15);
        addDataItem(ukSeries, HEALTHCARE, 2);
        addDataItem(ukSeries, CLOTHING, 6);
        
        japanSeries.setName(JAPAN);
        addDataItem(japanSeries, FOOD, 23);
        addDataItem(japanSeries, HOUSING, 22);
        addDataItem(japanSeries, TRANSPORTATION, 10);
        addDataItem(japanSeries, HEALTHCARE, 4);
        addDataItem(japanSeries, CLOTHING, 4);

        Scene scene = new Scene(barChart, 800, 600);
        barChart.getData().addAll(usaSeries, canadaSeries2, ukSeries, japanSeries);
        stage.setScene(scene);
        stage.show();
    }

    public void addDataItem(XYChart.Series<String, Number> series,
            String x, Number y) {
        series.getData().add(new XYChart.Data<>(x, y));
    }

    @Override
    public void start(Stage stage) {
        simpleBarChartByCountry(stage);
    }

    public static void main(String[] args) {
        launch(args);
    }

}

If you run the main you should see the following window:

Files and directories in Java: the NIO.2 Approach

In the previous post I told you about the old fashioned way to handle files in java.
In this article we will focus on the new API.
The File class is no longer used. We will use the “Path” class instead.
Files is a utility class to create either files or directories, that takes a path in the constructor:

	Path filePath=Paths.get("/home/laura/demo.txt");
	Files.createFile(filePath);
	
	Path dirPath=Paths.get("/home/laura/newdir");
	Files.createDirectory(dirPath);
	
	Path nestedDirPath=Paths.get("/home/laura/newdir3/newdir4");
	Files.createDirectories(nestedDirPath);

The “createDirectories” method created the whole file system structure (the nested directories).

With NIO.2 copying or deleting a file or directory have become a matter of one line of code, thanks to the very straightforward methods “copy”, “delete”, etc.

Many things can be achieved with the utility classes Files and Paths.

Java IO: Handling characters files efficiently

Let´s take a look a the classic IO file handling in java.
First let´s start with the “File” class.
The File class is not used to read or write data. It´s used to create or delete files and directories, for searching and working with paths.
So it´s not used for the files or directories content.

The File class constructor does not create anything on the hard drive. As you can see in the following snippet, you need to use the createNewFile method for it:

		File file = new File("/home/laura/demo.txt");
		System.out.println("Does the file exists?"+file.exists());
		boolean created = file.createNewFile();
		System.out.println("File created?"+created);
		System.out.println("Does the file exists?"+file.exists());

The createNewFile method returns “false” if the file already exists.

If the goal is handling text files, you don´t need to use any Stream class. All you need is a writer one. The basic option is to use the naked “FileReader” and “FileWriter” classes:

		FileWriter fileWriter= new FileWriter(file);
		fileWriter.write("hello world. this is a text file.");
		fileWriter.flush();
		fileWriter.close();
		
		FileReader fileReader= new FileReader(file);
		char[] in = new char[100];		
		int size = fileReader.read(in);
	
		System.out.println("File size:"+size);
		
		for(char c: in){
			System.out.print(c);
		}
	
		fileReader.close();

The FileReader method “read” delivers the amount of character read.

Notice that after writing the text into the file, you need to call the method “flush”. It´s necessary to call it to make sure that the whole data flows into the file before closing the writer.

So far so good. But this simple way shown above is not the most elegant solution out there, because we have been using an array (that has a fixed size)!

A much better approach is wrapping it up using the classes BufferedReader and BufferedWriter:

		FileWriter fileWriter= new FileWriter(file);
		BufferedWriter bufferedWriter = new BufferedWriter(fileWriter);
		
		bufferedWriter.write("hello world. this is a text file.");
		bufferedWriter.newLine();
		bufferedWriter.write("You are using the buffered reader now!");			
		bufferedWriter.close();
		
		FileReader fileReader= new FileReader(file);
		BufferedReader bufferedReader = new BufferedReader(fileReader);
		
		String data;			
		while((data=bufferedReader.readLine())!=null){
			System.out.println(data);		
		}
		
		bufferedReader.close();

Notice that buffered reader also has a method called “readLine”, that you wouldn´t get with a simple File reader.
Once you close a writer it cannot be reopened again. You get an exception if you use it after closing it!

Debugging and Testing in Java : enabling assertions

For testing and debugging purposes you can enable the assertions evaluation with the VM parameter “-ea” ( or “-enableassertions” if you prefer the whole thing).

The assertions remain in the code and are just ignored at runtime if you don´t enable them. You can think of them as an aid in case of need.

The following method throws an exception if the parameter given is not a String containing “Laura”:


         private void testFirstName(String firstName){
                 assert(firstName.equals("Laura"));

               System.out.println("The given first name is Laura");
         }

A string message can be displayed in the stack trace, by adding a second expression to the assertion, like :

	private void testFirstName(String firstName){
		assert(firstName.equals("Laura")) : "the name "+ firstName+ " is not Laura!";
		
		System.out.println("The given first name is Laura");
	}

The output in this second case would be something like:

Exception in thread "main" java.lang.AssertionError: the name Anna is not Laura!
at com.demo.AssertionsDemo.testFirstName(AssertionsDemo.java:15)
at com.demo.AssertionsDemo.main(AssertionsDemo.java:8)

Since Java 1.4 “assert” has become a keyword.

Assertions can be disabled with the VM option “-da” or “-disableassertions”. Although the assertions are disabled by default, the manual disabling might make sense if you don´t want to enable the assertions for all the classes.

For example if you want to run a java jar file (for example “demo.jar”), but disabling the assertions for one of its classes (ex. “com.demo.Demo.java”) you need to use the following parameters:

> java -jar -ea -da:com.demo.Demo

To disable them for the whole “com.demo” package (including subpackages):

> java -jar -ea -da:com.demo...

So entering VM parameters like “-ea:” or “-ea:” allow you to select which assertions to evaluate.

Java: the Comparable and Comparator interfaces

The Comparable interface allows you to sort by a specific object variable that you choose for your needs.
Take a look at the following object:

public class Book implements Comparable&lt;Book&gt; {
	
	private String title;
	private String author;
	private double price;
	
	public Book(String title, String author, double price) {
		super();
		this.title = title;
		this.author = author;
		this.price = price;
	}

	public String getAuthor() {
		return author;
	}

	public void setAuthor(String author) {
		this.author = author;
	}


	public double getPrice() {
		return price;
	}

	public void setPrice(double price) {
		this.price = price;
	}

	public String getTitle() {
		return title;
	}

	public void setTitle(String title) {
		this.title = title;
	}


	@Override
	public int compareTo(Book that) {
		return Double.valueOf(this.price).compareTo(Double.valueOf(that.price));
	}

	public String toString() {
		return &quot; \n &quot; + title + &quot; \t &quot; + author + &quot; \t &quot; + price;
		}
		
}

Notice the way the compareTo method is overriden. It´s a double primitive variable, but you need the wrapper class to compare it. The following wouldn´t work:

	@Override
	public int compareTo(Book that) {
		return this.price.compareTo(that.price);
		return 0;
	}

Implementing the Comparable interface affects the sorting criteria. For example:

import java.util.Arrays;

public class ComparableTest{
	
	public static void main(String[] args) {
		
		Book[] books= {
		new Book(&quot;The capital&quot;,&quot;Marx,Karl&quot;,10.5),
		new Book(&quot;Interpretation of dreams&quot;,&quot;Freud, S.&quot;,12.5),
		new Book(&quot;Killed by Death&quot;,&quot;Kilmister, Lemmy&quot;,8)
		};
		
		System.out.println(&quot;Before sorting: \n&quot;+Arrays.toString(books));

	Arrays.sort(books);
	System.out.println(&quot;\n After sorting: \n&quot;+Arrays.toString(books));
	
	}
	
}

The output is:

Before sorting:
[
The capital Marx,Karl 10.5,
Interpretation of dreams Freud, S. 12.5,
Killed by Death Kilmister, Lemmy 8.0]


After sorting:
[
Killed by Death Kilmister, Lemmy 8.0,
The capital Marx,Karl 10.5,
Interpretation of dreams Freud, S. 12.5]


If you need to do a more complex comparison, you can make your own comparator by extending the Comparator interface (not “Comparable”).
For example you can create your own Comparator:

public class BookComparator implements Comparator&lt;Book&gt; {

	@Override
	public int compare(Book b1, Book b2) {
		
		int comparePrice = Double.valueOf(b1.getPrice()).compareTo(Double.valueOf(b2.getPrice()));
		if (comparePrice!=0) 
			{return comparePrice;
			}
		else return b1.getAuthor().compareTo(b2.getAuthor());
	}

}

It tries to order by price first, but ifthe books have the same price, they will be sorted by the author name too.

If you runt the following main method:

	public static void main(String[] args) {

		ArrayList&lt;Book&gt; booksList = new ArrayList&lt;Book&gt;();
		booksList.add(new Book(&quot;The capital&quot;, &quot;Marx,Karl&quot;, 10.5));
		booksList.add(new Book(&quot;Peace and War&quot;, &quot;Tostoj. L.&quot;, 12.5));
		booksList.add(new Book(&quot;Interpretation of dreams&quot;, &quot;Freud, S.&quot;, 12.5));
		booksList.add(new Book(&quot;Killed by Death&quot;, &quot;Kilmister, Lemmy&quot;, 8));
		
		System.out.println(&quot;before sorting:&quot;);
		for (Book book : booksList) {
			 System.out.println( book.toString());

		}

		Collections.sort(booksList, new BookComparator());
		System.out.println(&quot;&quot;
				+ &quot;\n after sorting:&quot;);
		
		for (Book book : booksList) {
			 System.out.println(book.toString());

		}

Then you see the following output:

before sorting:
The capital Marx,Karl 10.5
Peace and War Tostoj. L. 12.5
Interpretation of dreams Freud, S. 12.5
Killed by Death Kilmister, Lemmy 8.0

after sorting:
Killed by Death Kilmister, Lemmy 8.0
The capital Marx,Karl 10.5
Interpretation of dreams Freud, S. 12.5
Peace and War Tostoj. L. 12.5

Notice the order of the last two books.


Getting started with Java Threads – Part 2 : join() and sleep()

The thread class provides some methods to define the threads behavior.
Two important methods to consider are:
join(), to make the other instanced threads to wait for it to day. You can provide a timeout as parameter.
sleep();

The sleep() method throws a checked exception called “InterruptedException”,each time the thread receives an interrupt request. You have to handle in the code by wrapping the method in a try-catch block.

The following code will make you understand the join method.
We define a MyThread thread:

public class MyThread implements Runnable {

	public void run() {
		Thread thread= Thread.currentThread();
		System.out.println("Implementing the runnable interface"
				+ " - Thread name: " + thread.getName()
				+ " - priority: " + thread.getPriority()
				+ " - group: " + thread.getThreadGroup().getName());

	}

}

Then we can observe the behaviour running the following main:

		public static void main(String[] args) {

		// extending Thread
		Thread myThread = new Thread(new MyThread());
		Thread myJoiningThread = new Thread(new MyThread());

		myThread.setName("myThread");
		myJoiningThread.setName("myJoiningThread");

		System.out.println("Threads will be started...");

		myJoiningThread.start();

		try {
			// waits for this thread to die
			myJoiningThread.join();
		} catch (InterruptedException e1) {
			// TODO Auto-generated catch block
			e1.printStackTrace();
		}
		myThread.start();

	}

Without the try-catch block in which the join method is invoked the threads would be started asynchronously (the order is not predictable) and in the console you might get either:
Threads will be started...
Implementing the runnable interface - Thread name: myThread - priority: 5 - group: main
Implementing the runnable interface - Thread name: myJoiningThread - priority: 5 - group: main

or:

Threads will be started...
Implementing the runnable interface - Thread name: myJoiningThread - priority: 5 - group: main
Implementing the runnable interface - Thread name: myThread - priority: 5 - group: main

But if you include the try-catch block, the myJoiningThread will always be invoked first.

To understand the sleep method you can create a MySleepingThread:

public class MySleepingThread implements Runnable {

	public void run() {
		Thread thread= Thread.currentThread();
		try {
			Thread.sleep(3000);
		} catch (InterruptedException e) {
			// TODO Auto-generated catch block
			e.printStackTrace();
		}
		System.out.println("Implementing the runnable interface"
				+ " - Thread name: " + thread.getName()
				+ " - priority: " + thread.getPriority()
				+ " - group: " + thread.getThreadGroup().getName());

	}

}

Then you can run the following main method:

public static void main(String[] args) {

		// extending Thread
		Thread myThread = new Thread(new MyThread());
		Thread mySleepingThread = new Thread(new MySleepingThread());
		myThread.setName("myThread");
		mySleepingThread.setName("mySleepingThread");

		System.out.println("Threads will be started...");

		mySleepingThread.start();
		myThread.start();

	}

You can see in the console that the sleeping thread will be started after 3 seconds.

The sleep method is static. By invoking “Thread.sleep(3000)” you are delaying the creation of the current thread.

If you use the method in the main method, the sleeping thread will be “main”.

Getting started with Java Threads – Part 1

I am learning for the Java OCP 7 and summarizing some relevant infos about Multithreading.
For now I am referring to chapter 13 in the book by G.Ganesh.

You can create threads in 2 ways: extending the Thread class or implementing the Runnable interface
Extending the Thread class is more convenient if you don´t need to extend another class that is not “Thread” (since in java you can only extend one class), because you can use the class methods directly (like “getName()“).
If you implement the Runnable interface (preferred way because of inheritance) you will have to use the static method “currentThread()” of the Thread class to do your operations on the thread (like setting or getting the name).

The two fundamental methods to know are:
run(): like a main method, necessary to enable the execution of a thread.
start(): that creates the thread.

The thread will be terminated when the run method execution is complete. It´s invoked implicitly by the JVM (DON´T invoke it explicitly!).
The main method starts a Thread called “main“. If you create and start your own thread it will have default names like “Thread-0“, “Thread-1“.

If you extend the thread class you need to override the run() method (otherwise it does nothing). If you implement the Runnable interface you will have to implement the run() method (mandatory)

The following code will help you to understand more about these first concepts.

public class MyThread1 extends Thread {

	public void run() {
		System.out.println("Extending the Thread class - Thread name: "
				+ getName() + " - priority: " + getPriority() + " - group: "
				+ getThreadGroup().getName());

	}

}
public class MyThread2 implements Runnable {

	public void run() {
		Thread thread= Thread.currentThread();
		System.out.println("Implementing the runnable interface"
				+ " - Thread name: " + thread.getName()
				+ " - priority: " + thread.getPriority()
				+ " - group: " + thread.getThreadGroup().getName());

	}

}
public class ThreadsDemo {

	public static void main(String[] args) {

		// extending Thread
		Thread myThread1 = new MyThread1();
		// implementing Runnable
		Thread myThread2 = new Thread(new MyThread2());

		System.out.println("Threads defined. Default properties: ");
		//name, priority, group returned by the toString method 
		System.out.println(myThread1);
		System.out.println(myThread2);
		System.out.println("Changing default names...");
		myThread1.setName("Thread_1");
		myThread2.setName("Thread_2");
		System.out.println("Threads will be started...");
		myThread1.start();
		myThread2.start();

	}

}

The output of the main method should be something like:

Threads defined. Default properties:
Thread[Thread-0,5,main]
Thread[Thread-1,5,main]
Threads will be started...
Extending the Thread class - Thread name: Thread-0 - priority: 5 - group: main
Implementing the runnable interface - Thread name: Thread-1 - priority: 5 - group: main

Launching the main program you see that the threads are started asynchronously. Sometimes you see:
Implementing the runnable interface - Thread name: Thread-1
Extending the Thread class - Thread name: Thread-0

Sometimes it´s:
Extending the Thread class - Thread name: Thread-0
Implementing the runnable interface - Thread name: Thread-1

You can quickly proof it in Eclipse launching the program with the shortcut Ctlr+11.

To change this “random” behaviour you can set the priority with the setPriority() method, from 1, the lowest, to 10, the highest. The default is 5. They can be all retrieved by the static members:
– Thread.NORM_PRIORITY ;
– Thread.MAX_PRIORITY ;
– Thread.MIN_PRIORITY .

Threads can be in one of the following states:
– NEW (created)
– RUNNABLE (started)
– TERMINATED
– BLOCKED (waiting to acquire the lock)
– WAITING (waiting for notifications)
– TIMED_WAITING (sleep() invoked and the thread is sleeping or if wait() with timeout)

States are defined with the Thread.State enumeration.
You can get the state with the getState() method.

Wildfly Apache Modcluster : Error MODCLUSTER000042

I was dealing with the Apache modcluster configuration for the Wildfly load balancing and I ran into the following error

[Server:server-four] 16:55:00,093 ERROR [org.jboss.modcluster] (UndertowEventHandlerAdapter - 1) MODCLUSTER000042: Error MEM sending STATUS command to localhost/127.0.0.1:6666, configuration will be reset: MEM: Can't read node

The error occurs when the servers are “idle”, that is where there is nore request from the browser for a time longer than the keep alive timeout setting.

Wildfly Standalone clustering

To set up a cluster of standalone servers you have two possibilites: nodes running on different machine (horizontal scaling) or running on the same machine (vertical scaling).

To make a wildfly standalone cluster with 2 nodes on the same machine you can follow the steps below:

1) copy the standalone folder and rename it to „standalone1“, „standalone2

2) create 2 scripts in the /bin folder, to avoid typing all the parameter in the command line each time.

script1.sh

#!/bin/sh
./standalone.sh -Djboss.server.base.dir=$JBOSS_HOME/standalone1 -Djboss.node.name=server1 -c standalone-full-ha.xml

script2.sh

#!/bin/sh
./standalone.sh -Djboss.server.base.dir=$JBOSS_HOME/standalone2 -Djboss.node.name=server2 -c standalone-full-ha.xml -Djboss.socket.binding.port-offset=100

To bind the public interface to a specific address add the IP as parameter like the following :
-b 192.168.1.1
For the management console it´s something like:
-bmanagement=192.168.1.1

To bind to all available IPs set them to „0.0.0.0“ like:
-b 0.0.0.0 -bmanagement=192.168.1.1

The high availability configuration has default multicast addresses set to 230.0.0.4.

They can also be changed in the socket-binding section in the standalone xml file.

Alternatively you can add it as parameter like : -u=230.0.1.2

The port offset must be considered, if you need to run the cli for the second instance specify the port:
./jboss-cli.sh --controller=localhost:10090 --connect

3) Set the hornetQ clustering username and password.

The cluster nodes must have the same user und password otherwise you will get:

ERROR [org.hornetq.core.server] (default I/O-1) HQ224018: Failed to create session:
HornetQClusterSecurityException[errorType=CLUSTER_SECURITY_EXCE
PTION message=HQ119099: Unable to authenticate cluster user: HORNETQ.CLUSTER.ADMIN.USER]

To fix this add the cluster username and password in the subsystem messaging:2.0 for any standalone xml configuration file under the tag hornet1-server :

 <clustered>true</clustered>
<cluster-user>clusteruser</cluster-user>
<cluster-password>cluster-secret</cluster-password>

Otherwise you can set to false if you don ́t need to cluster the messaging.

4) run the scripts in two different terminals (start with server 1).

5) deploy the app.
The clustering service will be initiated only if a cluster-enabled application is deployed.
In the web.xml of the application you need to add the distributable tag:

<distributable/>

You need to deploy the app in every server instance

You can try it with the app by Arun Gupta called „clustering“, that you can find at https://github.com/arun-gupta/wildfly-samples.
To make it a little simpler you can create a maven simple project and copy the content in the webapp folder (https://github.com/arun-gupta/wildfly-samples/tree/master/clustering/http/src/main/webapp).
Then you can edit the pom.xml like the following:

<project xmlns="http://maven.apache.org/POM/4.0.0" xmlns:xsi="http://www.w3.org/2001/XMLSchema-instance" xsi:schemaLocation="http://maven.apache.org/POM/4.0.0 http://maven.apache.org/xsd/maven-4.0.0.xsd">
  <modelVersion>4.0.0</modelVersion>
  <groupId>de.demo</groupId>
  <artifactId>demo-clustered-app</artifactId>
  <version>0.0.1-SNAPSHOT</version>
  <packaging>war</packaging>
  <name>Demo_Clustered_App</name>

  <properties>
        <project.build.sourceEncoding>UTF-8</project.build.sourceEncoding>
        <project.reporting.outputEncoding>UTF-8</project.reporting.outputEncoding>
    </properties>

    <dependencies>
        <dependency>
            <groupId>javax</groupId>
            <artifactId>javaee-api</artifactId>
            <version>7.0</version>
            <scope>provided</scope>
        </dependency>
    </dependencies>

    <build>
        <plugins>
            <plugin>
                <groupId>org.apache.maven.plugins</groupId>
                <artifactId>maven-compiler-plugin</artifactId>
                <version>3.1</version>
                <configuration>
                    <source>1.8</source>
                    <target>1.8</target>
                </configuration>
            </plugin>
            <plugin>
                <groupId>org.apache.maven.plugins</groupId>
                <artifactId>maven-war-plugin</artifactId>
                <version>2.4</version>
                <configuration>
                    <failOnMissingWebXml>false</failOnMissingWebXml>
                </configuration>
            </plugin>
        </plugins>
    </build>
</project>

Run mvn package. In the target folder you will find the .war file, that you can manually deploy in each management console.
At the following urls you will see that the node server names are different for the two urls but the session data is shared:
http://localhost:8080/demo-clustered-app-0.0.1-SNAPSHOT/index.jsp
http://localhost:8180/demo-clustered-app-0.0.1-SNAPSHOT/index.jsp

Once you get your app deployed on both instances in the logging of the server one you will see something like:

INFO [org.infinispan.remoting.transport.jgroups.JGroupsTransport] (Incoming-1,shared=udp) ISPN000094: Received new cluster view: [server1/web|1] (2) [server1/web, server2/web]

Defining a port offset is not the only way to set up a cluster on the same machine.
You can also define multiple IP addresses on the same machine (multihoming).

We use cookies to personalise content and ads, to provide social media features and to analyse our traffic. We also share information about your use of our site with our social media, advertising and analytics partners.
Cookies settings
Accept
Privacy & Cookie policy
Privacy & Cookies policy
Cookie name Active

Privacy Policy

What information do we collect?

We collect information from you when you register on our site or place an order. When ordering or registering on our site, as appropriate, you may be asked to enter your: name, e-mail address or mailing address.

What do we use your information for?

Any of the information we collect from you may be used in one of the following ways: To personalize your experience (your information helps us to better respond to your individual needs) To improve our website (we continually strive to improve our website offerings based on the information and feedback we receive from you) To improve customer service (your information helps us to more effectively respond to your customer service requests and support needs) To process transactions Your information, whether public or private, will not be sold, exchanged, transferred, or given to any other company for any reason whatsoever, without your consent, other than for the express purpose of delivering the purchased product or service requested. To administer a contest, promotion, survey or other site feature To send periodic emails The email address you provide for order processing, will only be used to send you information and updates pertaining to your order.

How do we protect your information?

We implement a variety of security measures to maintain the safety of your personal information when you place an order or enter, submit, or access your personal information. We offer the use of a secure server. All supplied sensitive/credit information is transmitted via Secure Socket Layer (SSL) technology and then encrypted into our Payment gateway providers database only to be accessible by those authorized with special access rights to such systems, and are required to?keep the information confidential. After a transaction, your private information (credit cards, social security numbers, financials, etc.) will not be kept on file for more than 60 days.

Do we use cookies?

Yes (Cookies are small files that a site or its service provider transfers to your computers hard drive through your Web browser (if you allow) that enables the sites or service providers systems to recognize your browser and capture and remember certain information We use cookies to help us remember and process the items in your shopping cart, understand and save your preferences for future visits, keep track of advertisements and compile aggregate data about site traffic and site interaction so that we can offer better site experiences and tools in the future. We may contract with third-party service providers to assist us in better understanding our site visitors. These service providers are not permitted to use the information collected on our behalf except to help us conduct and improve our business. If you prefer, you can choose to have your computer warn you each time a cookie is being sent, or you can choose to turn off all cookies via your browser settings. Like most websites, if you turn your cookies off, some of our services may not function properly. However, you can still place orders by contacting customer service. Google Analytics We use Google Analytics on our sites for anonymous reporting of site usage and for advertising on the site. If you would like to opt-out of Google Analytics monitoring your behaviour on our sites please use this link (https://tools.google.com/dlpage/gaoptout/)

Do we disclose any information to outside parties?

We do not sell, trade, or otherwise transfer to outside parties your personally identifiable information. This does not include trusted third parties who assist us in operating our website, conducting our business, or servicing you, so long as those parties agree to keep this information confidential. We may also release your information when we believe release is appropriate to comply with the law, enforce our site policies, or protect ours or others rights, property, or safety. However, non-personally identifiable visitor information may be provided to other parties for marketing, advertising, or other uses.

Registration

The minimum information we need to register you is your name, email address and a password. We will ask you more questions for different services, including sales promotions. Unless we say otherwise, you have to answer all the registration questions. We may also ask some other, voluntary questions during registration for certain services (for example, professional networks) so we can gain a clearer understanding of who you are. This also allows us to personalise services for you. To assist us in our marketing, in addition to the data that you provide to us if you register, we may also obtain data from trusted third parties to help us understand what you might be interested in. This ‘profiling’ information is produced from a variety of sources, including publicly available data (such as the electoral roll) or from sources such as surveys and polls where you have given your permission for your data to be shared. You can choose not to have such data shared with the Guardian from these sources by logging into your account and changing the settings in the privacy section. After you have registered, and with your permission, we may send you emails we think may interest you. Newsletters may be personalised based on what you have been reading on theguardian.com. At any time you can decide not to receive these emails and will be able to ‘unsubscribe’. Logging in using social networking credentials If you log-in to our sites using a Facebook log-in, you are granting permission to Facebook to share your user details with us. This will include your name, email address, date of birth and location which will then be used to form a Guardian identity. You can also use your picture from Facebook as part of your profile. This will also allow us and Facebook to share your, networks, user ID and any other information you choose to share according to your Facebook account settings. If you remove the Guardian app from your Facebook settings, we will no longer have access to this information. If you log-in to our sites using a Google log-in, you grant permission to Google to share your user details with us. This will include your name, email address, date of birth, sex and location which we will then use to form a Guardian identity. You may use your picture from Google as part of your profile. This also allows us to share your networks, user ID and any other information you choose to share according to your Google account settings. If you remove the Guardian from your Google settings, we will no longer have access to this information. If you log-in to our sites using a twitter log-in, we receive your avatar (the small picture that appears next to your tweets) and twitter username.

Children’s Online Privacy Protection Act Compliance

We are in compliance with the requirements of COPPA (Childrens Online Privacy Protection Act), we do not collect any information from anyone under 13 years of age. Our website, products and services are all directed to people who are at least 13 years old or older.

Updating your personal information

We offer a ‘My details’ page (also known as Dashboard), where you can update your personal information at any time, and change your marketing preferences. You can get to this page from most pages on the site – simply click on the ‘My details’ link at the top of the screen when you are signed in.

Online Privacy Policy Only

This online privacy policy applies only to information collected through our website and not to information collected offline.

Your Consent

By using our site, you consent to our privacy policy.

Changes to our Privacy Policy

If we decide to change our privacy policy, we will post those changes on this page.
Save settings
Cookies settings